I really like the flat-shaded, low-poly style especially when combined with nice lighting. Unfortunately, the simplest, most common approach to achieving this look is far from optimal. In this article I’ll cover ways for achieving this look more optimally in Unity using its scriptable and standard rendering pipelines.
Flat-Shading Using Vertex Normals
The simplest way to achieve flat shading is to specify that the faces should be rendered that way in whatever tool is used to model them. For example, Blender makes this easy with options on its right-click menu for “Shade Flat” vs. “Shade Smooth.” Selecting “Shade Flat” will result in the model being exported with per-vertex normals that are aligned to the normal of their polygon.
The first issue with this approach is that polygons with more than three edges are not always truly “flat” – meaning that a polygon’s vertices may not all lie on the same plane. Since GPUs and most rendering engines work with triangles, these polygons will be converted (arbitrarily) to triangles during export.
The good news is that the per-vertex normals will still be assigned to the calculated normal of the original polygon. While this might render as desired at first, the bad news is that the non-coplanar triangles can cause problems once additional effects such as screen-space ambient occlusion are enabled.

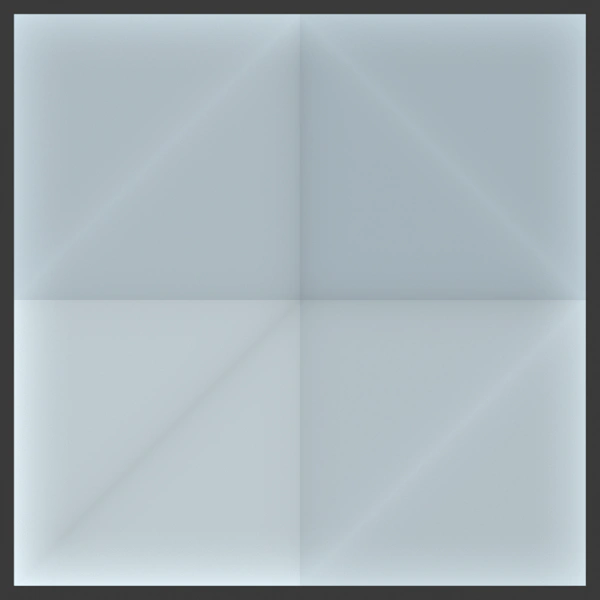
The image on the left shows the desired rendering of a 2x2 grid of quads with only the vertex in the middle lowered. The image on the right shows the undesired results after enabling ambient occlusion. It should be possible to fix this issue by accounting for the normal in the ambient occlusion shader, but neither Blender nor Unity do this currently.
The more important issue with using per-vertex normals to achieve flat shading is its memory and performance penalties. When smooth shading is used, the middle vertex in the mesh shown above can be shared by each of the adjacent triangles which results in a fairly substantial memory savings as well as a performance boost as the GPU will likely only need to process the vertex once.
However, when flat shading is applied, the center vertex can no longer be shared as each adjacent quad requires it to have a different normal. This will result in slower runtime performance and an increase in the amount of memory required to store the mesh for rendering.
Calculating Face Normals in a Fragment Shader
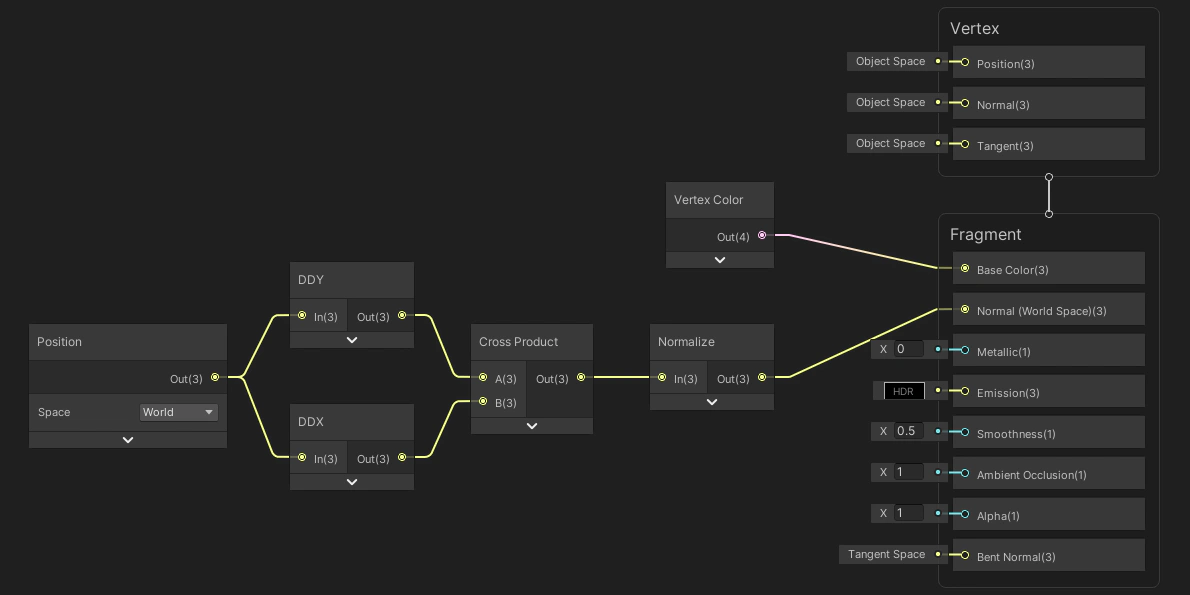
If you don’t mind having normals calculated per triangle (vs. polygon), then there is a fairly inexpensive way to calculate them at runtime in a pixel shader. The benefit of this approach is that the per-vertex normals are no longer needed which makes for optimal vertex sharing and memory savings. The key to doing this is to use the partial-derivative shader functions ddx and ddy:
normal = normalize( cross( ddy( worldPosition ), ddx( worldPosition ) ) )There’s one small issue with this, however. The normal calculated above will be in world-space and depending on your shader and renderer setup in Unity, it will most likely need to be in tangent space. How this is handled depends on the type of rendering pipeline being used (scriptable vs. standard pipeline).
Calculating Normals in a Scriptable Rendering Pipeline Using a Shader Graph
When using a scriptable rendering pipeline (HDRP or LWRP), a fairly simple shader graph can be created to calculate normals per-triangle. This graph performs the calculation above to compute the normal in world-space and then assigns it to the Normal (World Space) output. Note the default Normal output is Tangent Space, but this must be changed in the Graph Inspector under Graph Settings / HDRP / Surface Option / Fragment Normal Space.
To use this, simply recreate it as a shader graph in Unity or download the HDRP shader graph version here and select it on the desired material:
Calculating Normals in a Standard Pipeline (Deferred) Shader
For most shader tasks that use the standard rendering pipeline, Unity provides surface shaders which simplify the task of writing a new shader. Unfortunately, calculating the world-to-tangent transform is a bit painful with these types of shaders, and the result would still be an un-optimized shader similar to the shader graphs above. The solution is to write a fully custom shader with custom vertex and fragment shaders.
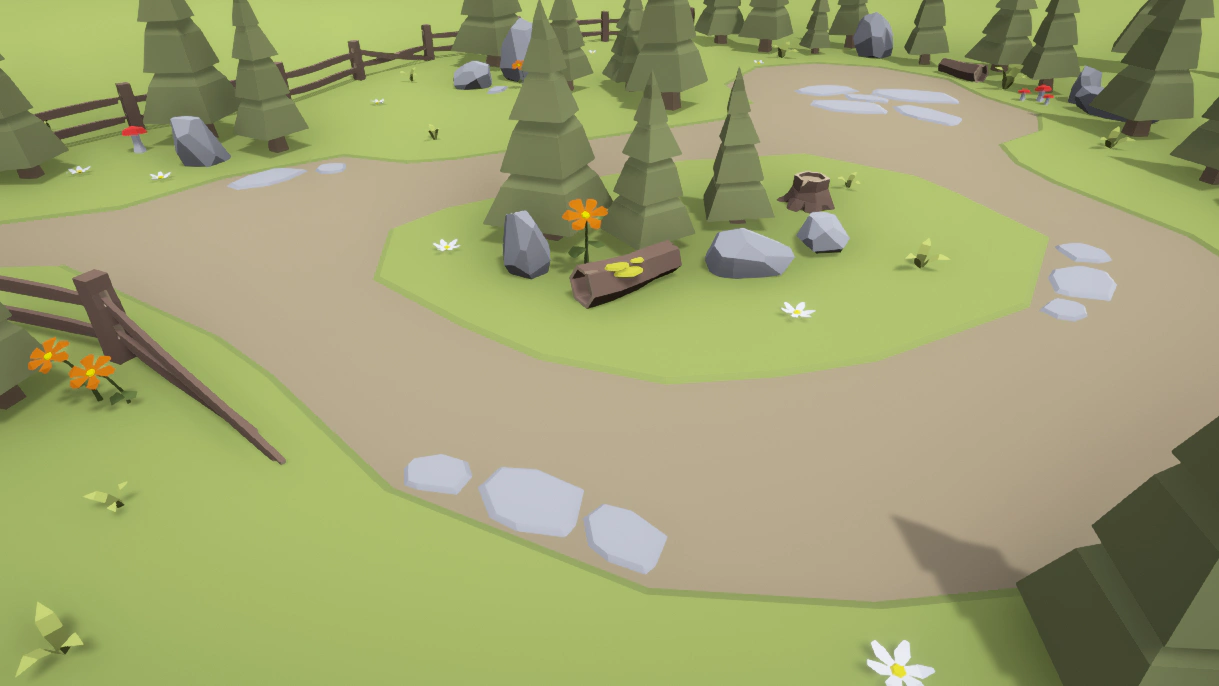
The image above shows the results of this shader using Unity’s deferred rendering path along with enhancements from their post processing stack (FXAA, SSAO, Bloom, Vignette, and Color Grading). The shader uses vertex color data from the mesh and calculates per-face normals using the equation above. Since the output normal for this type of shader is in world-space, no additional transforms are required which results in a very optimized shader.
Note that this is a very basic shader in that some specific effects may not work, but it should be fairly easy to understand what it does. The main goal of the vertex shader ProcessVertex() method is to produce the world-space position:
output.worldPosition = mul(unity_ObjectToWorld, vertex.position);This position is then used to calculate the world-space normal in the fragment shader ProcessFragment() method:
surfaceOutput.Normal = normalize( cross( ddy( input.worldPosition ),
	ddx( input.worldPosition ) ) );
There is also support for the ForwardBase pass which is used by Unity to render previews and thumbnails in the Editor as well as the ShadowCaster pass which is used to render an optimized pass when a model is drawn into a shadow buffer. GPU instancing is also supported, and since vertex colors are used, only one instance of this material should be needed for rendering all opaque geometry in a scene. This should result in near-optimal rendering times for both the CPU and GPU.
Remember that this technique does not require per-vertex normals. In order to save as much video memory as possible, Normals should be set to None in the Geometry section of each model’s import settings in Unity. This can be easily automated with a custom AssetPostprocessor to remove both normals and tangents.